I have created the ImageShover JavaScript module by implementing following
ECMAScript ECMA-262 v3 features (better known as JavaScript v1.5)
- Closure functions
- Dynamic subclassing of JavaScript objects
Moreover, I have applied these features of the W3C DOM and DHTML
in order to achieve the following:
- Lazy loading of JavaScript modules
- Browser compatible event handling (W3C DOM Level 2.0 and Internet Explorer)
- Dynamic event attachment/detachment
My ImageShover JavaScript module provides following elaborated features:
- Accelerated movement
- Supports direction specific movement images
I wanted the ImageShover JavaScript module to demonstrate my in-depth knowledge of
- the JavaScript language
- object oriented design
- W3C DOM
- and browser APIs
Thus, I didn't use JQuery,
Raphaël or any other JavaScript framework
to accomplish and ease the task. However, my website's blog site map and upcoming JavaScript
demonstrations are going to be implemented using either of those.
First, link to the ImageShover module file.
The ImageShover JavaScript module is almost unobtrusive, though not completely.
It adds a namespace into the web page context:
The AxelDahmen namespace then contains three publicly visible classes:
- AxelDahmen.ImageShover
- AxelDahmen.ImageShover.ImageContext
- AxelDahmen.ImageShover.MovingImageURLs
All other classes required by the ImageShover JavaScript module are loaded on
demand when the ImageShover constructor runs for the first time.
After linking to the ImageShover module file in your HTML file, next create an image supposed
to flee from the mouse pointer. (In the following I'll call this image the Fugitive.)
Finally create an ImageShover object to handle the image's movement.
The most simple way to create a Fugitive image requires three items:
- a Fugitive <img> element in the HTML document.
- a <div> element surrounding the Fugitive <img> element.
- a call to the AxelDahmen.ImageShover constructor, providing it with both above elements.
The HTML elements must have the following CSS rules applied in order to have the
ImageShover JavaScript module work properly:
| Element |
Prerequisites |
| Fugitive <img> element |
position: relative |
| <div> element surrounding the Fugitive |
display: inline-block |
These CSS rules will automatically be applied to the above elements if they have not been
defined in the HTML or CSS file.
The ImageShover JavaScript module uses the <div> element surrounding
the Fugitive <img> element to define the area that is to be considered the "safety
margin". Whenever the mouse pointer enters the <div> element, the image begins to
flee in the opposite direction.
As soon as the mouse pointer leaves the <div> element again, the area is
regarded "safe" and the images starts returning to its original position.
Here's an example of a simple implementation of a Fugitive image:
...
<div id="area" style="width: ...; height: ...; display: inline-block;">
<img id="fugitive" src="..." alt="" style="position: relative;" />
</div>
<script type="text/javascript">
var imgCtx = new AxelDahmen.ImageShover.ImageContext("area", "fugitive");
new AxelDahmen.ImageShover(imgCtx);
</script>
...
The ImageShover constructor will automatically attach events to the provided HTML
elements so that the image will properly be animated. Thus, it is not necessary to call a
separate "start" member function to start the process.
Index and directions
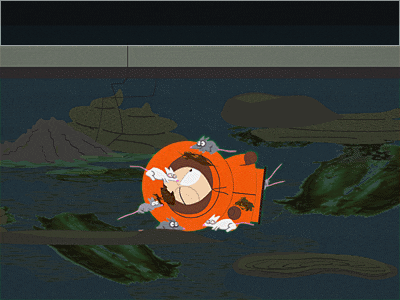
of 2 movement images
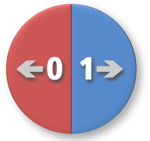
[click to enlarge]
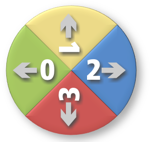
Index and directions
of 4 movement images
[click to enlarge]
Index and directions
of 5 movement images

[click to enlarge]
But there is more to it: You can have the image automatically be replaced
by other images while it moves across the HTML page! With this option you can set images
to "point" to the direction where the Fugitive is currently moving to.
You can use as many images as you like, each pointing to another direction. The first
image will be used for movements pointing to 9 o'clock. If you add additional images,
each of them will be automatically clockwise assigned to a different angle range, depending
on the number of images you add.
For example, if you add four movement images, the first one will be used for a spread
of 90° around the direction pointing to the left (9 o'clock), the next image will be
used for a spread of 90° around the direction pointing to the top (12 o'clock) and so on...
If you add two movement images, the first one will be used for a spread
of 180° around the direction pointing to the left (9 o'clock), the second image will be
used for a spread of 180° around the direction pointing to the right (3 o'clock).
If you only add one movement image, it will be used for movements in any direction.
To use movement images on the Fugitive image object, you create a
AxelDahmen.ImageShover.MovingImageURLs object, providing it with an array of image
URLs plus a minimum speed at which the still image is supposed to be replaced with
the appropriate moving image.
Here's an example, creating two movement images and applying it to the ImageShover
constructor. Please note the first argument to the constructor, giving the minimum speed
at which any of the moving images is being displayed:
var $ImageShover=AxelDahmen.ImageShover; // namespace abbreviation
var moveImgs = $ImageShover.MovingImageURLs(0.5, ["left_bound.gif", "right_bound.gif"]);
var imgCtx = new $ImageShover.ImageContext("area", "fugitive", moveImgs);
new $ImageShover(imgCtx);
But that's by far not all to it. You can even assign a different set of
moving images to different speeds!
This is done by creating more than one MovingImageURLs object and creating each
of them with a different minimum speed. After you have created them, add an array of these
MovingImageURLs objects to the ImageContext constructor.
Here's an example of creating two MovingImageURLs objects, one providing images
for a speed higher than 0.5 pixels per time interval and another providing images for speeds
higher than 10 pixels per time interval:
var $ImageShover=AxelDahmen.ImageShover; // namespace abbreviation
var moveImgWalk = $ImageShover.MovingImageURLs(0.5, ["left_walk.gif", "right_walk.gif"]);
var moveImgRun = $ImageShover.MovingImageURLs(10, ["left_run.gif", "right_run.gif"]);
var imgCtx = new $ImageShover.ImageContext("area", "fugitive", [moveImgWalk, moveImgRun]);
new $ImageShover(imgCtx);
There are three more optional parameters to be used with the
ImageContext constructor:
- Acceleration
- Maximum speed
- Rewind animation
Acceleration must be a number between (but not including) 0 and 1. It determines
how quickly the maximum speed is being reached and how quickly movement ceases when the
Fugitive image reaches near its actual end point. A value near 0.1 results in a very
jumpy movement whereas a value near 0.9 yields quite a turpid acceleration.
Maximum Speed is rather self-explanatory. Use it to set the
maximum distance to be moved per time interval.
The sixth, and final, parameter, Rewind animation, comes into
play if you use animated images (e.g. by means of an
animated GIF).
If this parameter is set to true, the animation of an image is rewound when it becomes
"active", i.e. replaces an other of the movement images because angle or speed of the moving
object have changed. By setting this parameter to true you can display complex movement
animations, showing behaviour that needs a particular beginning sequence, e.g. a balloon
that's always inflating first before it explodes. If any movement images are present, this
parameter is applied to the still image as well.
If any of the optional arguments is omitted, the ImageContext
constructor will use following default values:
| Argument |
Default value |
| Movement images |
null |
| Acceleration |
0.6 |
| Maximum speed |
20 |
| Rewind animation |
false |
This is all there is to know about how to construct and use a Fugitive
image object.
But wait - we were only using one single ImageContext
object for the ImageShover constructor so far. But right at the beginning I wrote that
there may be a second argument provided to the ImageShover constructor. What is this
optional second constructor parameter and what can it be used for?
Until now we've been discussing an image object I called the Fugitive because it flees
whenever the mouse pointer comes near to it. But providing a second ImageContext
object to the ImageShover constructor you can animate a second image object which
does right the opposite of the Fugitive: It actually follows the mouse pointer!
Using the second image is pretty much the same like using the Fugitive
image. The Follower's <img> HTML element must reside in a <div>
HTML element just like the Fugitive image has to.
In contrast to the Fugitive image, however, you can apply an initial position to the
Follower image using style positioning. The ImageShover JavaScript module
reads the positioning values and will use them as initial value for animating the
Follower object. Please note that the initial position must be given in pixels.
If you don't provide CSS positioning values, a position of "left: 0px; top: 0px"
is assumed.
Usually the Follower's <div> element surrounds the Fugitive's
<div> element. But there is no requirement for setting-up the HTML document
structure this way.
Here's a simple example of creating a fugitive image and a follower image:
...
<div id="stage" style="width: ...; height: ...; position: relative;">
<div id="fleeArea" style="width: ...; height: ...; display: inline-block;">
<img id="fugitive" src="..." alt="" style="position: relative;" />
</div>
<img id="follower" src="..." alt="" style="position: absolute;" />
</div>
<script type="text/javascript">
var imgCtxFugitive = new AxelDahmen.ImageShover.ImageContext("fleeArea", "fugitive");
var imgCtxFollower = new AxelDahmen.ImageShover.ImageContext("stage", "follower");
new AxelDahmen.ImageShover(imgCtxFugitive, imgCtxFollower);
</script>
...
The Follower HTML elements must have the following CSS rules applied in order to have the
ImageShover JavaScript module work properly:
| Element |
Prerequisites |
| Follower <img> element |
position: absolute |
| <div> element surrounding the Follower |
position: relative|absolute |
The above CSS rules will automatically be applied to these elements if they have
not been defined in the HTML or CSS file.
Important: For the ImageShover JavaScript module to
work properly, the Follower <img> and <div> elements must not
be child elements of the Fugitive <div> element!
The ImageShover constructor accepts a third, optional,
parameter: A parameterless onload event handler function. This function will be
called by the ImageShover JavaScript module as soon as all images and JavaScript
files have been loaded successfully. You can use this function to update the page to
reflect the readiness of the page functionality.
You may omit the Follower argument of the ImageShover constructor
and optionally provide an onload event handler function as the second argument.
The ImageShover constructor will recognize the function type of the second
argument and use it as onload event handler then.
The Follower image object will always follow the mouse pointer at
a random distance that changes whenever the mouse pointer leaves the Follower's
<div> element and the follower stands still. This prevents the Follower
object from permanently hiding what's beneath the mouse pointer.
The ImageShover JavaScript library uses a dedicated
function to output runtime errors that may occur: AxelDahmen.ImageShover.errorHandler.
The default implementation displays error messages using the built-in
alert() JavaScript function. You may want to overwrite the
AxelDahmen.ImageShover.errorHandler function with your own error handler
function in order to display runtime errors differently. Just replace the given
errorHandler function with any function of yours accepting a single string
argument containing the error message.